
Ubuntu 17.10 and VirtualBox: Installing Windows from a Bootable USB
After dual-booting between Ubuntu and Windows for years, I finally made the switch to full-time Ubuntu. However, the need to use Photoshop lead me to try setting up a Windows install within VirtualBox, from an OEM bootable windows USB provided with my Lenovo laptop.
In the end I actually ended up going back to a dual-boot due to my Wacom tablet being pretty much unusable in VirtualBox. Perhaps some troubleshooting could have been done, but KISS. However, the details of my vBox struggle are documented below, in the hopes of saving others from running in circles.
Helpful Resources
- How to use Photoshop in Ubuntu (archived on WayBack Machine)
- StackOverflow thread on how to use VirtualBox with a bootable USB
Contents
- Install VirtualBox
- Create a .vmdk that points to your bootable USB
- Add your username to the “vboxusers” and “disk” groups
- VERR_ACCESS_DENIED: chown the .vmdk to your own username and group
- VERR_NOT_FOUND: Disable USB 3.0 controller, or install the extension pack to implement support for it
- VERR_VMX_MSR_LOCKED_OR_DISABLED: enable Hardware Virtualization via your BIOS
- Set up a virtual machine that boots from your .vmdk
- Hit the right Ctrl key to “capture” your mouse/keyboard, and boot from your device
1. Install VirtualBox
The easiest way that I have found to do this is to simply run the following:
’'’bash sudo apt-get install virtualbox sudo apt-get install virtualbox-ext-pack ‘’’
You can also download the .deb files from the VirtualBox download page and run sudo dpkg -i and sudo apt-get install -f as usual, but caused me to run into issues with a large list of missing dependencies. Apt-get is your friend.
2. Create a .vmdk that points to your bootable USB
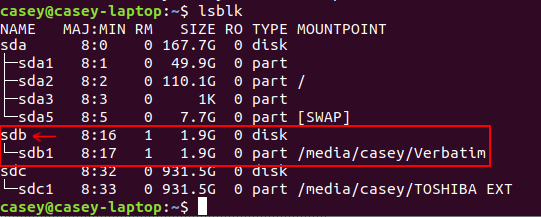
Plug your USB in. To find out the path to the physical drive where your USB is mounted, use the Disks utility or lsblk (“list block devices”). In this example here, to point to my Verbatim USB key, I’d use the path /dev/sdb.
Once you know the path to your USB (i.e. /dev/sdb), run the following to create a .vdmk (Virtual Machine Disk) file:
vboxmanage internalcommands createrawvmdk -filename ~/usb.vmdk -rawdisk /dev/sdb
This creates ~/usb.vmdk which points to your USB drive, assuming it is at /dev/sdb.
You should see the following success message or something similar:
RAW host disk access VMDK file /home/casey/usb.vmdk created successfully.
3. Add your username to the “vboxusers” and “disk” groups
Your username must be added to the vboxusers and disk groups in order for the rest of the steps to function:
sudo usermod -a -G vboxusers <username>
sudo usermod -a -G disk <username>
As pointed out in the StackOverflow thread, the latter command gives your username the permission to write to raw disk (accessing the disk at the byte level, as opposed to through the filesystem). This creates a substantial data loss and security risk. I recommend removing your username from the disk group after you are finished installing from the bootable USB via the following:
gpasswd -d <username> disk
4. VERR_ACCESS_DENIED: chown the .vmdk to your own username and group
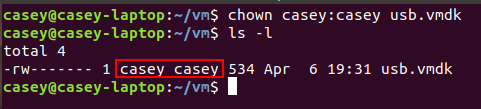
I must have mindlessly thrown a sudo in somewhere along the way, because my usb.vmdk was owned by root at first, meaning VirtualBox wasn’t be able to open it. If you run into the same issue, you must run the following to chown (change owner) usb.vmdk to your own username and group:
sudo chown <username>:<username> usb.vmdk
You can run ls -l to double check that the ownership has been changed to your username:
5. VERR_NOT_FOUND: Disable USB 3.0 controller, or install the extension pack to implement support for it
The next error I ran into was the following:
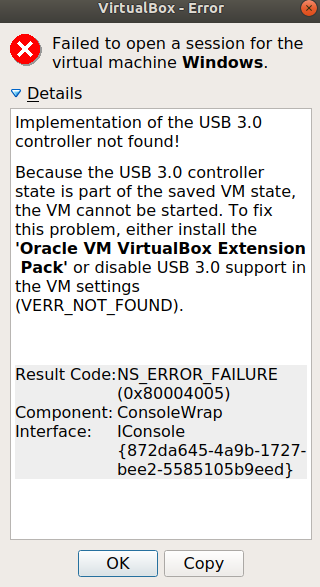
Implementation of the USB 3.0 controller not found!
Because the USB 3.0 controller state is part of the saved VM state, the VM cannot be started. To fix this problem, either install the ‘Oracle VM VirtualBox Extension Pack’ or disable USB 3.0 support in the VM settings (VERR_NOT_FOUND).
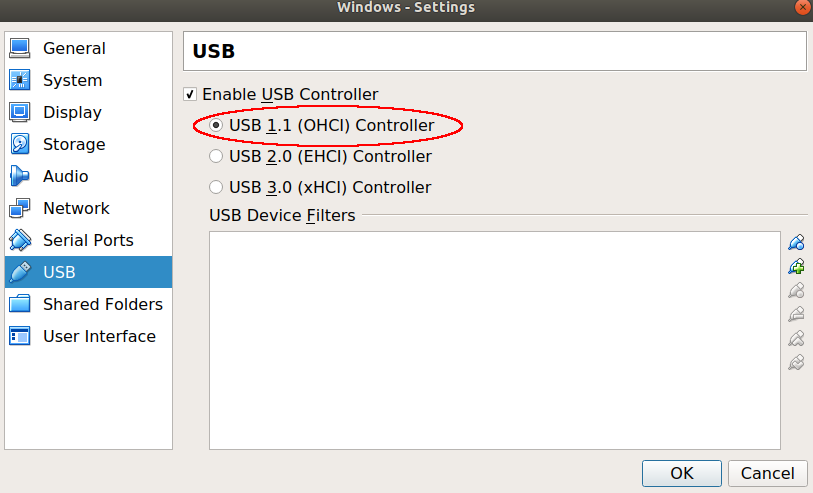
USB 2.0 wasn’t implemented either. Again, keeping it simple, I opted to just go with USB 1.1. Installing the extension pack is also an option, see here for more details.
6. VERR_VMX_MSR_LOCKED_OR_DISABLED: enable Hardware Virtualization via your BIOS
Turns out I didn’t actually have hardware virtualization enabled in my BIOS. So restart, boot into your BIOS setting screen, and look for “Virtualization”, “Hardware Virtualization”, “VT-x”, or something along those lines. How to do this will be specific to your own BIOS: see this thread for more details.
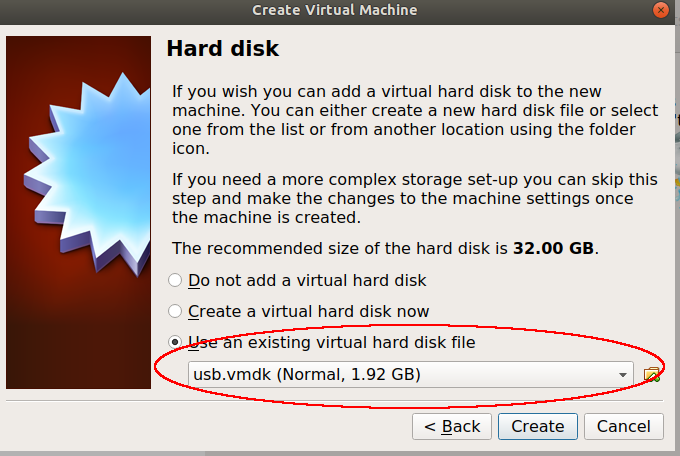
7. Set up a virtual machine that boots from your .vmdk
During the setup process, select your usb.vmdk file in the following prompt. I used the default settings in all other screens.
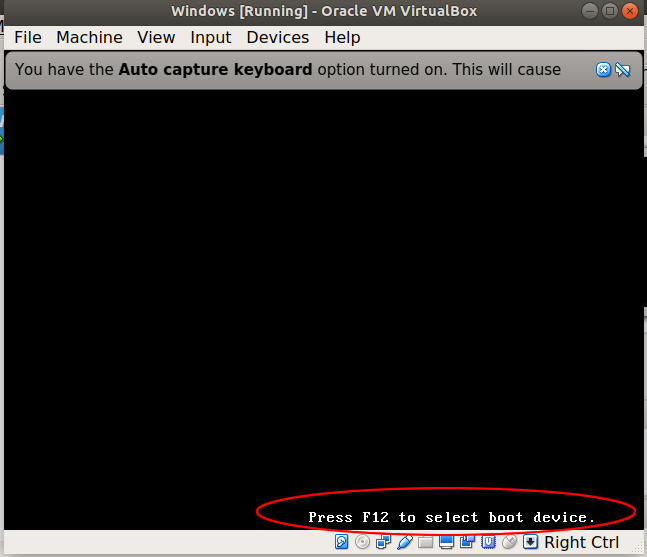
8. Hit the right Ctrl key to “capture” your mouse/keyboard, and boot from your device
This last part drove me insane. I’m not sure if this was a feature specific to my setup, but I had to hit F12 within a few seconds to select the USB as my boot device upon starting the VM, or else be sent off to boot from hard disk (which hard disk? I have no idea). This would, of course, fail.
After frantically hitting F12 each time and getting no response, I accidentally clicked within the VM window and finally got this popup:
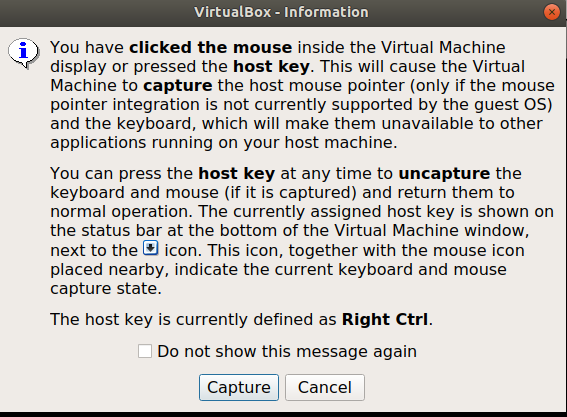
Hallelujah. Upon starting the VM, I would quickly hit the right Ctrl button and then immediately hit F12, which, if done in time, would bring up a boot device menu that allowed me to finally boot into my USB.
So there you have it. Hope this helps!